
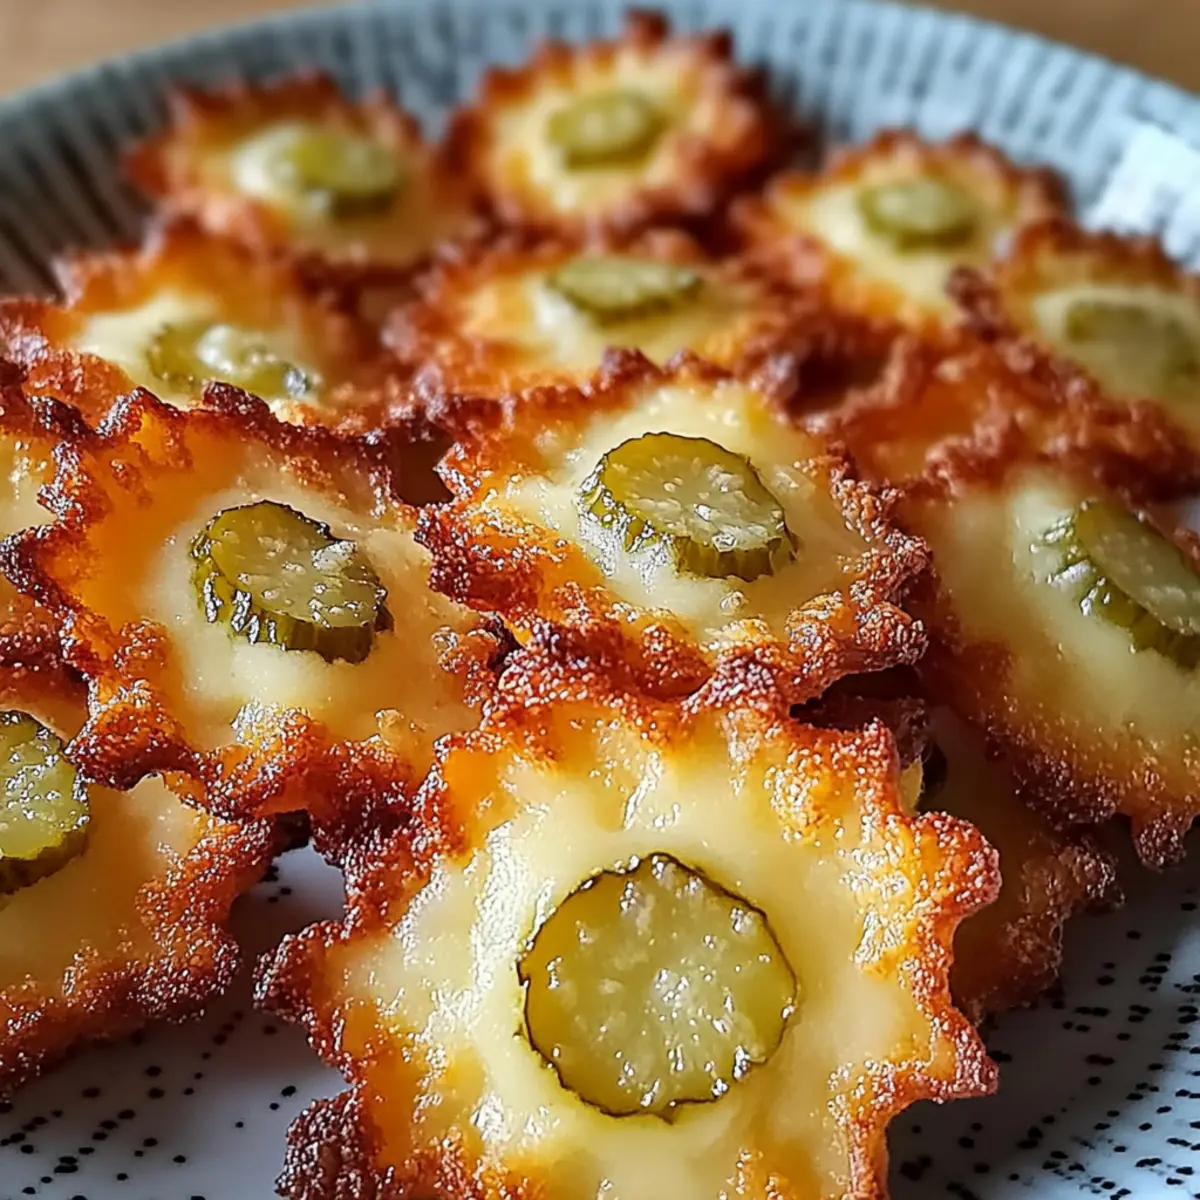
As the smell of warm, cheesy goodness wafts through the kitchen, a delightful surprise awaits: Crispy Dill Pickle Cheese Bites! These irresistible morsels combine the satisfying crunch of a golden crust with the zesty burst of dill pickles to create a snack that’s both fun and flavor-packed. Even better, they’re gluten-friendly and take just 21 minutes to prepare, making them a perfect quick bite for the entire family. Whether you’re hosting a gathering or simply kicking back for movie night, these crispy bites are bound to be a hit with kids and adults alike. Curious how to whip up this scrumptious snack that’s sure to become a staple in your home? Let’s dive into the recipe!

Why are these Pickle Cheese Bites special?
Gluten-Friendly Delights: These bites are a fantastic option for anyone needing gluten-free snacks without sacrificing flavor or fun.
Kid-Approved & Family-Friendly: Even picky eaters won’t be able to resist these cheesy, tangy treats, making them perfect for dinner parties or family movie nights.
Quick & Easy: Ready in just 21 minutes, they’re an effortless solution for last-minute cravings or surprise guests.
Versatile Recipes: Experiment by adding ingredients like jalapeños for a spicy twist or using different cheeses, like Pepper Jack, for new flavor profiles.
Perfect For Dipping: Pair these bites with creamy ranch dressing or spicy mayo to elevate their taste and presentation—perfect for gatherings or snack time!
Get ready to impress your family and friends with these delightful Crispy Dill Pickle Cheese Bites that are sure to be the talk of the table!
Pickle Cheese Bites Ingredients
• Experience the joy of flavorful bites with these easy-to-gather ingredients!
For the Cheese Mixture
- Shredded Cheddar Cheese – Provides sharpness and depth of flavor; freshly shredded is preferred for better melting.
- Shredded Mozzarella Cheese – Adds stretchiness and creaminess; fresh mozzarella works best for optimal melting.
For the Flavor
- Finely Chopped Dill Pickles – Offers tangy flavor and moisture; ensure pickles are patted dry to reduce excess moisture for crispiness.
- Garlic Powder – Adds savory depth and aroma; onion powder can be used as a substitution for a different flavor profile.
For the Crunch
- Breadcrumbs (Optional) – Contributes extra crunch; gluten-free breadcrumbs can be utilized for dietary needs.
For Preparation
- Nonstick Spray or Parchment Paper – Prevents sticking during baking; parchment paper is recommended for easy cleanup.
Gather these ingredients, and you’re just moments away from crispy, gluten-friendly pickle cheese bites that promise to be a hit!
Step‑by‑Step Instructions for Crispy Dill Pickle Cheese Bites
Step 1: Preheat Your Oven
Begin by preheating your oven or air fryer to 400°F (200°C). This crucial step ensures that your Crispy Dill Pickle Cheese Bites will cook evenly and acquire that perfect golden brown exterior. Use a reliable thermometer to confirm the temperature as it helps achieve optimal cooking results.
Step 2: Combine Ingredients
In a large mixing bowl, combine shredded cheddar cheese and mozzarella cheese with finely chopped dill pickles and a generous sprinkle of garlic powder. If you desire extra crunch, feel free to add gluten-free breadcrumbs to the mixture. Stir well until everything is evenly cloaked in cheesy goodness, creating a tantalizing blend that’s packed with flavor.
Step 3: Prepare the Baking Sheet
Take a baking sheet and line it with parchment paper to prevent sticking. This will make cleanup a breeze after you enjoy your delicious Crispy Dill Pickle Cheese Bites! Ensure the parchment paper is laid flat to avoid any bubbling, which can affect the cooking process and presentation.
Step 4: Form the Bites
Using a spoon or cookie scoop, gather the cheese mixture and place slightly flattened mounds onto the lined baking sheet, leaving some space in between each. This spacing is essential for proper cooking; it allows air circulation around your bites. Each mound should be around the size of a golf ball to ensure consistent cooking.
Step 5: Bake to Perfection
Slide the baking sheet into your preheated oven and bake for 6-8 minutes. Keep a close eye on them; the edges should turn golden brown, and the cheese should be bubbling invitingly. This is the moment when your kitchen fills with an irresistible aroma, signaling that your crispy treats are nearly ready.
Step 6: Allow to Cool Slightly
Once removed from the oven, let the bites cool on the baking sheet for 2-3 minutes. This cooling period allows the bites to firm up, ensuring that they are extra crispy and easy to handle. You’ll notice the cheese setting slightly, solidifying those savory cheesy pockets within.
Step 7: Serve and Enjoy
Finally, serve your Crispy Dill Pickle Cheese Bites warm alongside your favorite dipping sauces, such as creamy ranch dressing or spicy mayo. Arrange them beautifully on a platter for an inviting presentation. Everyone will love diving into this delightful snack, making it a perfect choice for gatherings, movie nights, or simple cravings.
Pickle Cheese Bites Variations
Feel free to customize your Crispy Pickle Cheese Bites to suit your taste or dietary preferences!
-
Dairy-Free: Substitute with vegan cheese alternatives to create a delicious dairy-free version without losing flavor.
-
Spicy Kick: Add crushed red pepper flakes or diced jalapeños for an exciting heat that’ll spice up your snack time.
-
Different Cheese Variety: Mix it up by trying Parmesan or Pepper Jack cheese, which can introduce unique flavor profiles to each bite.
-
Veggie Twist: Incorporate finely chopped bell peppers or scallions to add fresh colors and textures to your bites.
-
Low-Carb Option: Replace breadcrumbs with ground almonds or almond flour for a low-carb alternative that’s just as yummy.
-
Mini Bites: Roll the cheese mixture into smaller balls for bite-sized snacks—perfect for parties or quick snacks on the go.
-
Herby Infusion: Stir in fresh or dried herbs like dill or chives to elevate the flavor profile and add herbal notes.
For even more delicious ideas, try these pairings with your Cream Cheese Filled snacks or enjoy some flavorful Garlic Steak Bites as a main dish. Your options are endless!
Expert Tips for Perfect Pickle Cheese Bites
-
Dry Those Pickles: Pat the dill pickles thoroughly with paper towels to remove excess moisture. This step is key to achieving crispier bites.
-
Chill the Mixture: Allow the cheese mixture to chill for about 10 minutes before baking. This will help the bites hold their shape during cooking, ensuring a perfect texture.
-
Watch Baking Time: Ovens vary, so keep an eye on your Crispy Pickle Cheese Bites. Remove them when they’re golden brown and bubbly for the best flavor and crunch.
-
Serving Fresh: Enjoy your bites immediately while they are warm and crispy. If reheating leftovers, use an oven or air fryer for that freshly baked taste.
-
Experiment with Flavors: Don’t hesitate to customize! Try adding crushed red pepper flakes for some heat or different cheeses to elevate your pickle cheese bites experience.
Make Ahead Options
These Crispy Dill Pickle Cheese Bites are a fantastic choice for meal prep, saving you time on busy weeknights! You can prepare the cheese mixture (combining shredded cheddar, mozzarella, dill pickles, and garlic powder) up to 24 hours ahead of time. Simply cover and refrigerate it until you’re ready to bake. When you’re set to enjoy your delicious snacks, scoop the mixture onto a lined baking sheet and bake as directed. This method ensures your bites maintain their crispy texture and delightful flavor, creating an easy, stress-free experience for you and your family while keeping these gluten-friendly snack bites just as mouthwatering!
Storage Tips for Crispy Pickle Cheese Bites
Fridge: Store any leftover crispy pickle cheese bites in an airtight container for up to 3 days. Reheat in an oven or air fryer until they regain their crunch.
Freezer: Freeze cooled bites by placing them in a single layer on a baking sheet for flash freezing. Once firm, transfer to a freezer-safe container for up to 2 months. Reheat from frozen at 375°F (190°C) for 10-12 minutes for best results.
Wrapping: If you’re planning to store them in the fridge, make sure to wrap them tightly to prevent any moisture from affecting their crispiness.
Reheating: For optimal texture, always reheat leftover crispy pickle cheese bites in the oven or air fryer rather than the microwave—this keeps them crispy and delightful!
What to Serve with Crispy Pickle Cheese Bites
As you savor the crunchy, cheesy goodness of these delightful bites, consider complementing your spread with these delicious pairings that enhance every bite.
-
Creamy Ranch Dressing: This classic dip adds a refreshing creaminess that balances the tangy flavor of pickles perfectly. It’s a crowd favorite at any gathering!
-
Spicy Mayo: For those who love a kick, spicy mayo elevates the flavor profile with heat and creaminess, making each bite an adventure.
-
Crisp Garden Salad: A light, fresh salad filled with crisp veggies adds a refreshing contrast to the rich cheese bites, ensuring a well-rounded meal.
-
Veggie Platter: Serve alongside an array of crunchy vegetables; the fresh crunch enhances the snacking experience and adds vibrant colors to your table.
-
Fruit Salsa: A sweet fruit salsa, such as mango or pineapple, offers a delightful sweetness that contrasts beautifully with the salty, cheesy bites, creating a delightful balance of flavors.
Imagine serving these crispy pickle cheese bites at your next gathering, alongside these wonderful accompaniments, creating a feast your loved ones won’t soon forget!

Crispy Dill Pickle Cheese Bites Recipe FAQs
How do I choose the right pickles for this recipe?
Absolutely! When selecting dill pickles, look for ones that are firm and without any dark spots or blemishes. Freshly packed pickles not only bring brightness to the flavor but also have the ideal crunch for these bites. It’s important to pat them dry thoroughly before use to avoid excess moisture that can lead to sogginess.
What’s the best way to store leftover pickle cheese bites?
Leftovers can be stored in an airtight container in the fridge for up to 3 days. Make sure they are completely cooled before storing. When you’re ready to enjoy them again, simply reheat them in an oven or air fryer to restore their crispy texture—just a few minutes at 375°F (190°C) will do the trick!
Can I freeze these cheese bites?
Absolutely! To freeze, allow the crispy pickle cheese bites to cool completely. Place them in a single layer on a baking sheet to flash freeze for about an hour. Once frozen, transfer them to a freezer-safe container or bag where they can stay fresh for up to 2 months. When ready to enjoy, reheat directly from the freezer at 375°F (190°C) for about 10-12 minutes to get them nice and crisp again.
What should I do if my cheese bites don’t hold their shape?
Very! If your cheese bites aren’t holding shape, it might be due to excess moisture from the pickles. To fix this, make sure to thoroughly pat the pickles dry and chill the mixture for about 10 minutes before baking. This helps firm up the cheese mixture, enabling better structure when baked. Additionally, adjusting the baking time to ensure they are baked just until golden can help maintain their shape.
Are these pickle cheese bites safe for people with lactose intolerance?
If lactose is a concern, you can opt for dairy-free cheese alternatives to create your gluten-friendly pickle cheese bites! There are several vegan cheese brands available that melt well and can substitute for both cheddar and mozzarella. Just check labels for any allergens to ensure they align with dietary needs.
What are some tips for enhancing the flavor of these bites?
The more the merrier! Feel free to experiment with additional seasonings like crushed red pepper flakes for heat or adding finely chopped jalapeños for a fresh taste. You can even swap out cheese varieties, using Pepper Jack or adding grated Parmesan for a unique twist! Just remember to adjust the ingredients proportionately to maintain the right texture.

Crispy Pickle Cheese Bites: A Perfect Gluten-Friendly Snack
Ingredients
Equipment
Method
- Preheat your oven or air fryer to 400°F (200°C).
- In a large mixing bowl, combine shredded cheddar cheese and mozzarella cheese with finely chopped dill pickles and garlic powder. Add gluten-free breadcrumbs if desired.
- Line a baking sheet with parchment paper.
- Using a spoon or cookie scoop, form slightly flattened mounds of the cheese mixture on the baking sheet.
- Bake in the preheated oven for 6-8 minutes until the edges are golden brown and cheese is bubbling.
- Allow to cool on the baking sheet for 2-3 minutes.
- Serve warm with dipping sauces such as ranch dressing or spicy mayo.
Leave a Reply