
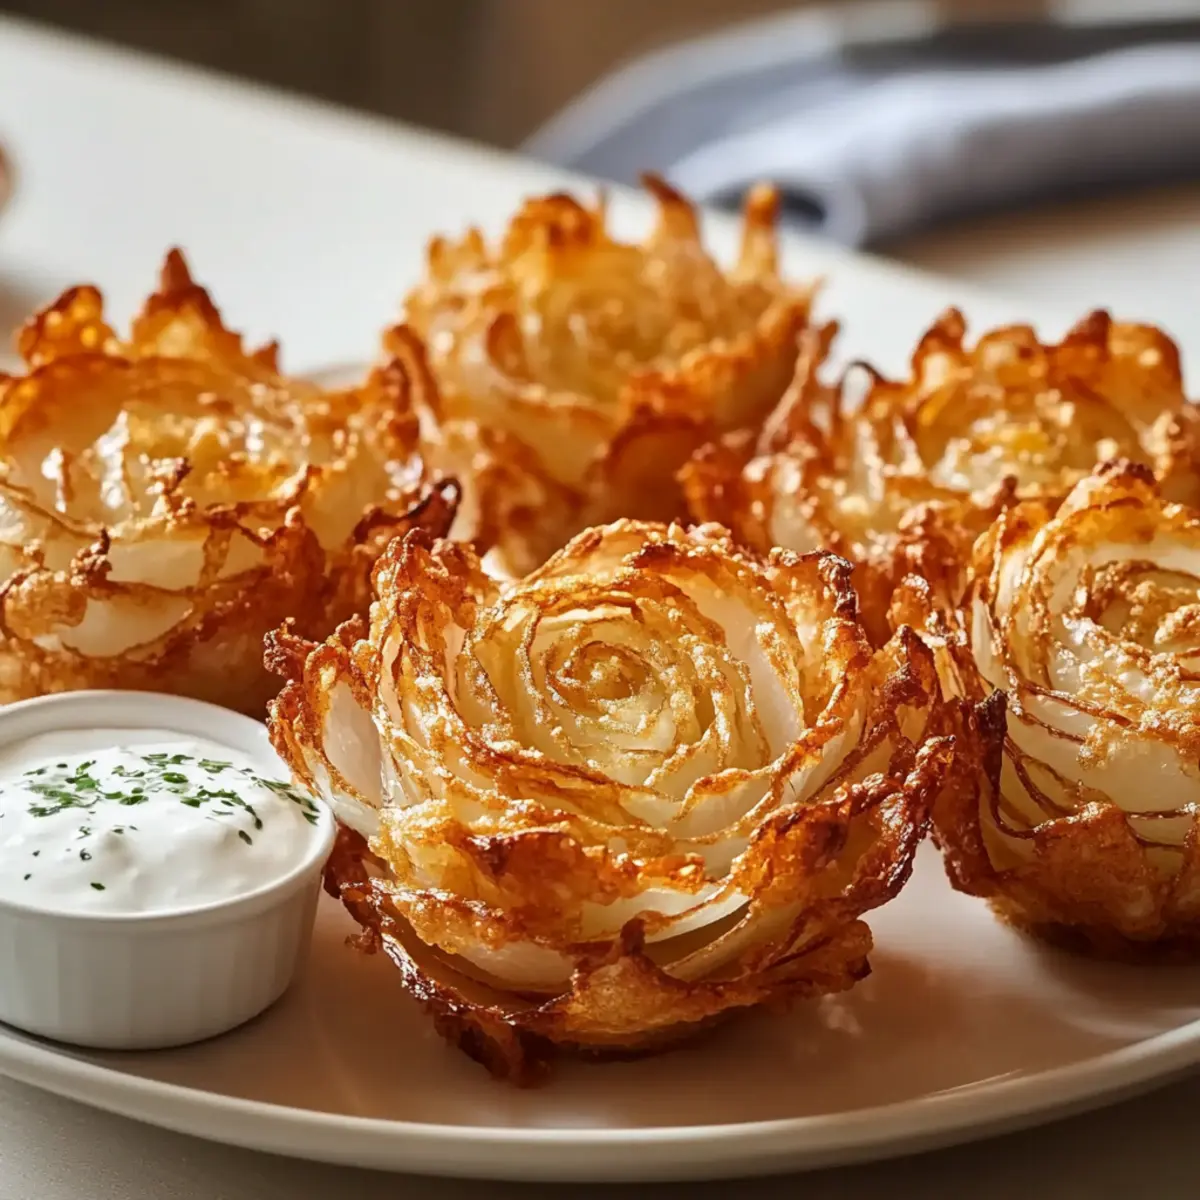
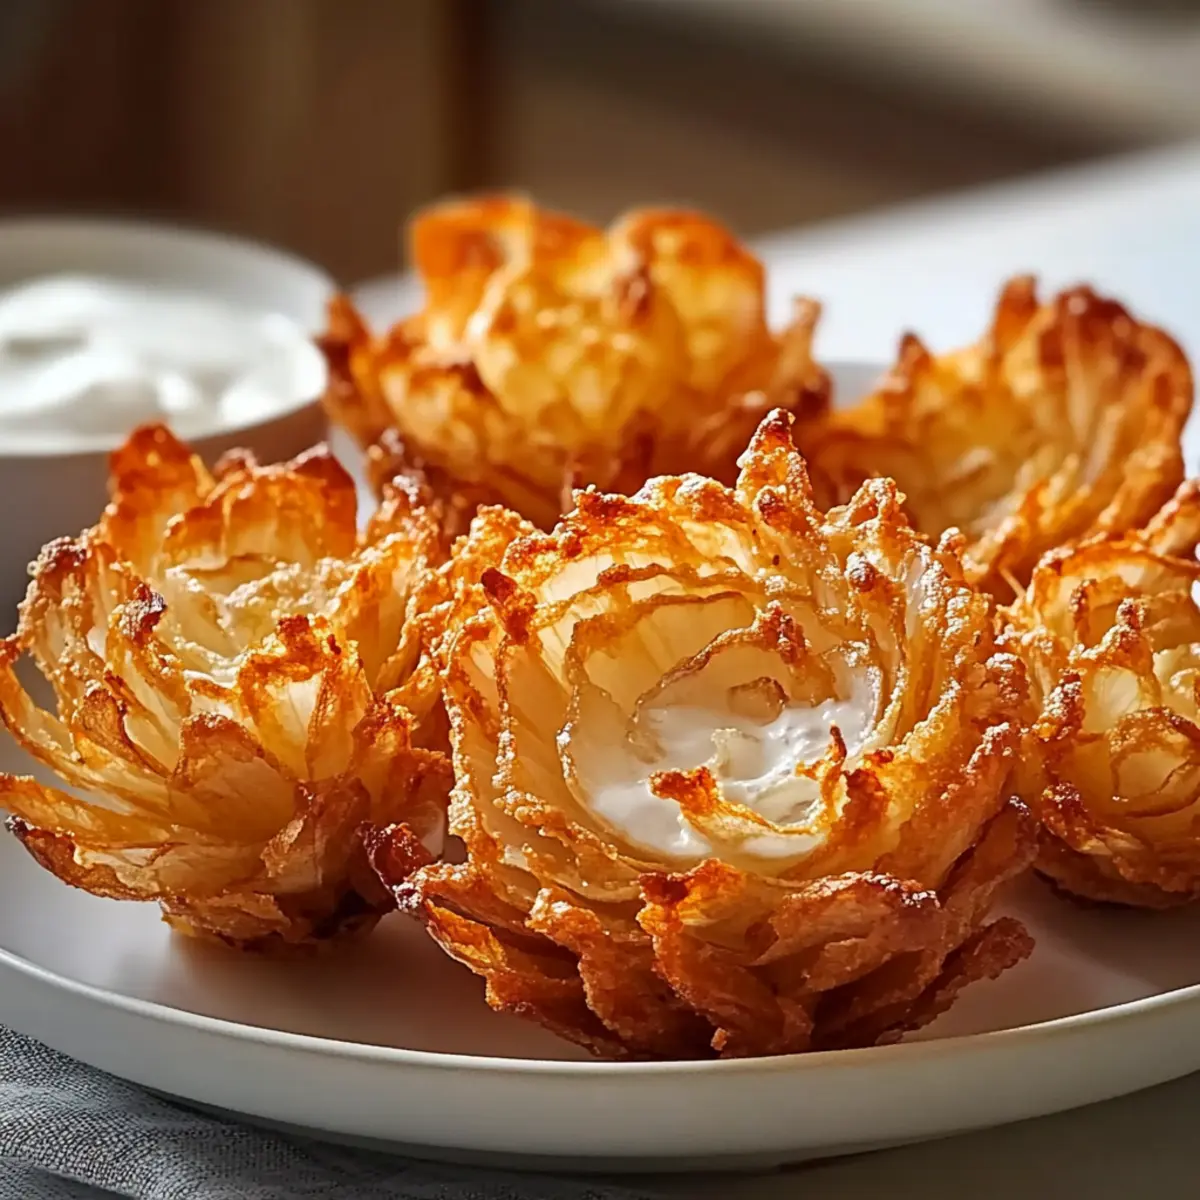
As I pulled the sizzling tray of baked bite-sized blooming onions from the oven, the enticing aroma filled my kitchen, instantly transporting me to summer fairs. This Blooming Onions Recipe is a delightful twist on a classic favorite, providing that fun, fair-like crunch we crave, minus the heavy mess of deep-frying. What I love most about these irresistible morsels is how quick and easy they are to prepare, making them the ultimate party appetizer. Plus, with versatile options that cater to gluten-free and dairy-free diets, everyone gets to enjoy this crowd-pleaser! Imagine presenting these golden, crispy petals with a variety of dipping sauces—your guests will be coming back for more! Are you ready to get started on this delicious adventure?

Why are Blooming Onions a Must-Try?
Simplicity: This Blooming Onions Recipe is so easy to make, even novice cooks can impress their guests. With just a few basic ingredients and steps, you’ll have a fantastic appetizer in minutes.
Versatility: Adapt this recipe for special diets! Whether you’re gluten-free or dairy-free, you can still enjoy these bites with simple substitutions, making them inclusive for all.
Crowd-Pleaser: Whether at a casual get-together or a festive party, these bite-sized beauties are sure to spark joy and keep everyone coming back for more. Pair them with your favorite dipping sauces for an unforgettable taste experience!
Healthier Choice: Baked instead of fried, these blooming onions offer a lighter option without sacrificing flavor. Enjoy all the crunch and sweetness without the guilt, and feel free to serve alongside other lighter fare like Crockpot Potato Soup for a balanced spread.
Aesthetic Appeal: With their unique flower-like shape, these onions are not just tasty but also visually stunning. They make an exceptional addition to your party table, elevating your appetizer game effortlessly!
Blooming Onions Recipe Ingredients
For the Onions
• Sweet Onions – The star ingredient provides a delightful sweetness; yellow or Vidalia onions can be used for varying sweetness levels.
For the Coating
• Flour – Creates that crunchy exterior; swap with a 1:1 gluten-free flour blend for a gluten-free version.
• Egg – Ensures the flour sticks for ultimate crispiness; can be replaced with flax egg or aquafaba for a vegan alternative.
• Seasoning Blend (paprika, garlic powder, onion powder, salt, pepper) – Essential for flavor; feel free to adjust spices to your liking and consider adding Parmesan for extra zing.
For Baking
• Oil (optional for spraying) – Helps achieve a beautifully browned and crispy coating; olive oil or cooking spray works perfectly here.
Step‑by‑Step Instructions for Blooming Onions Recipe
Step 1: Prepare the Onions
Begin by cutting off the root end of each sweet onion to create a stable base. Slice the onion in half vertically, then make gentle vertical cuts around the sides, ensuring to stop just before reaching the base so each petal remains attached. This creates a beautiful blooming effect for your bite-sized blooming onions.
Step 2: Soak the Petals
Fill a large bowl with ice water and gently place the cut onion petals inside, allowing them to soak for about 10 minutes. This step encourages the onions to open up and “bloom,” ensuring a lovely presentation when baked. After soaking, carefully remove them and let them drain on a clean kitchen towel.
Step 3: Make the Coating
In a mixing bowl, combine the flour with your seasoning blend, including paprika, garlic powder, onion powder, salt, and pepper. In another bowl, beat the eggs until frothy. This two-bowl setup will help you easily coat each onion petal with the crispy mixture for your blooming onions recipe.
Step 4: Coat the Onions
Take each onion petal and first dip it into the egg mixture, ensuring it’s fully coated. Then, transfer the petal to the flour mixture, pressing lightly to adhere the coating. Double-dip if you desire an extra crunch and repeat until all petals are coated evenly for those delightful bite-sized blooming onions.
Step 5: Space and Bake
Preheat your oven to 400°F (200°C) and line a baking sheet with parchment paper. Arrange the coated onion petals on the baking sheet, leaving space between them to ensure even cooking. Bake for 20-25 minutes, or until the onions are golden brown and crispy, inviting everyone to gather for this party appetizer.
Step 6: Serve and Enjoy
Once baked, remove the blooming onions from the oven and let them cool for a few minutes. Serve hot with your favorite dipping sauces, such as ranch or spicy mayo. These crispy bloomers will be a hit at your party, turning this blooming onions recipe into a memorable experience for your guests!

Storage Tips for Blooming Onions
Fridge: Store leftover blooming onions in an airtight container in the refrigerator for up to 3 days. This keeps them fresh while preserving that delicious flavor.
Freezer: If you want to save them longer, freeze the baked blooming onions in a single layer on a baking sheet before transferring them to a freezer bag. They’ll last for up to 2 months.
Reheating: To restore their crispiness, reheat in an oven or air fryer at 375°F (190°C) for 5-7 minutes. Avoid microwaving, as this can make them soggy.
Prep Ahead: You can also prepare the onions ahead of time and store them in the fridge before baking. Coated blooming onions can rest for up to 2 hours before baking for a quick party appetizer.
Make Ahead Options
These Blooming Onions Recipe bites are perfect for meal prep, allowing you to enjoy the deliciousness with minimal last-minute effort. You can coat the onion petals up to 2 hours in advance, storing them in the refrigerator until you’re ready to bake. For best results, ensure the petals are dry before coating to maintain crispiness. Once you’re prepared to serve, simply re-dip them in flour for added texture and then bake them at 400°F (200°C) for 20-25 minutes until golden brown. This make-ahead strategy not only saves you time on busy party days but guarantees your blooming onions remain just as delicious and enticing for your guests!
Blooming Onions Recipe Variations
Feel free to explore your creativity with these blooming onions; each suggestion brings a new layer of flavor and delight!
- Gluten-Free: Substitute traditional flour with a 1:1 gluten-free flour blend to accommodate dietary needs without sacrificing crunch.
- Vegan Option: Replace the egg with a flax egg or aquafaba for a plant-based alternative that still holds everything together beautifully.
- Herb-Infused: Add chopped fresh herbs like chives or parsley to the coating mix for an aromatic twist that enhances every bite.
- Spicy Kick: Mix in chili powder or cayenne pepper to the flour blend for a flavorful heat that perfectly contrasts the sweet onion.
- Cheesy Delight: Incorporate grated Parmesan cheese into the dry coating mixture for an indulgent, savory depth. This extra richness pairs brilliantly with any dipping sauce.
- Smoky Flavor: Smoked paprika can replace regular paprika in the seasoning for a delightful complexity that will wow your guests.
- Savory Blend: Introduce an Italian seasoning blend to the coating for a Mediterranean-inspired version that’s great with marinara sauce.
- Dipping Sauce Ideas: Prepare a variety of sauces, like homemade sriracha-yogurt dip or spicy mayo, because no blooming onions recipe is complete without fantastic dips!
Try these variations, and imagine hosting a gathering where everyone finds their favorite spin on these delightful bites! Pair them with dishes like Steak Bites Potatoes or a refreshing salad for an unforgettable feast.
Expert Tips for Blooming Onions Recipe
• Coating Consistency: Ensure that your onions are completely dry before coating. If the mixture doesn’t stick, the final result may be less crispy.
• Refrigerate Ahead: If preparing in advance, you can coat the onions and refrigerate them for up to 2 hours. Just give them a light re-dip in the flour blend before baking for extra crispiness.
• Baking Space: Don’t overcrowd the baking sheet! Giving each blooming onion enough space ensures that they crisp up beautifully without steaming.
• Adjust the Spices: Feel free to personalize your seasoning blend. Experiment with adding chili powder or fresh herbs for unique flavor profiles in your blooming onions recipe.
• Serving Temperature: Serve these beauties hot out of the oven for the best taste and texture. They taste wonderful right from the tray!
What to Serve with Baked Bite-Sized Blooming Onions
Bring vibrant flavors and textures to your table by pairing these crispy delights with complementary sides and drinks.
-
Ranch Dressing: This classic provides a creamy, cool contrast that balances the warm, crispy onions perfectly. Your guests will love the dip’s refreshing zing!
-
Spicy Mayo: A delightful kick that pairs beautifully with the sweetness of the blooming onions, making every bite an exciting experience. If your guests crave heat, this is the way to go.
-
Homemade Sriracha-Yogurt Dip: Combining spicy and creamy, this sauce elevates your blooming onion experience with its rich flavors. Plus, it’s easy to whip up in just minutes!
-
Crisp Green Salad: A refreshing mix of greens adds a light, crunchy element that complements the warm, hearty onions perfectly. Consider a tangy vinaigrette to brighten the dish.
-
Burgers or Sliders: Serve your blooming onions alongside mini burgers for an epic party spread. The savory flavors of your favorite patties enhance the party atmosphere.
-
Light Beer or Cider: Refreshing and effervescent, these drinks offer a crisp finish that brilliantly pairs with the flavor and crunch of the blooming onions.
-
Sweet Tea or Lemonade: A non-alcoholic option that imbues the gathering with a fun, summery vibe, effortlessly complementing the flavors of baked blooming onions.
Whatever you choose, these pairings will create a joyful feast that leaves everyone reminiscing about your delicious canapés!
Blooming Onions Recipe FAQs
What kind of onions should I use for the Blooming Onions Recipe?
I recommend using sweet onions for that delightful flavor, but you can easily swap them for yellow or Vidalia onions if you prefer a different sweetness level.
How should I store leftover blooming onions?
Leftover blooming onions should be stored in an airtight container in the refrigerator for up to 3 days. This keeps them fresh and flavorful!
Can I freeze blooming onions?
Absolutely! To freeze the baked blooming onions, place them in a single layer on a baking sheet until frozen solid. Then, transfer them to a freezer bag, where they can last for about 2 months. This way, you can enjoy them later!
What if my coating doesn’t stick properly?
No worries! If you find the coating not sticking, ensure your onions are completely dry before coating them. If the mixture still doesn’t adhere well, try giving the petals a light re-dip in the egg mixture, followed by the flour mix for that extra crispiness.
Can I make blooming onions gluten-free or vegan?
Very much so! For a gluten-free option, substitute regular flour with a 1:1 gluten-free flour blend. To make it vegan, replace the egg with a flax egg (1 tablespoon of ground flaxseed mixed with 2.5 tablespoons of water) or aquafaba. These simple substitutions make the blooming onions recipe inclusive for everyone!
Crispy Blooming Onions Recipe for Your Next Party Fun
Ingredients
Equipment
Method
- Cut off the root end of each sweet onion. Slice the onion in half vertically and make gentle vertical cuts around the sides, ensuring to stop just before reaching the base.
- Fill a bowl with ice water and gently place cut onion petals inside. Soak for about 10 minutes.
- In a mixing bowl, combine the flour with the seasoning blend. In another bowl, beat the eggs until frothy.
- Dip each onion petal into the egg mixture, then transfer to the flour mixture, pressing lightly to adhere the coating.
- Preheat your oven to 400°F (200°C) and line a baking sheet with parchment paper. Arrange the coated onion petals on the baking sheet, leaving space between them. Bake for 20-25 minutes until golden brown and crispy.
- Remove from the oven and let cool for a few minutes. Serve hot with your favorite dipping sauces.
Leave a Reply